Friday, May 27, 2022

Samsung dryer belts put off smell like marijuanna (dope/ cannabis)

Recently I've had to upgrade the rubber drum wheel rollers and replace a worn out belt tensioner pulley in my Samsung dryer model DV48H7400EW.

I sourced parts and ended up on Amazon.  The 'Dryer Upgrade kits' caught my eye, which includes new drum rollers, tensioner pulley and it's spring and a new belt.  I purchased the kit and was happy to have my dryer back in service again.  Or so I thought.


This new belt-- which looks superb...'High Quality'.  Don't be fooled.  

This is the belt which came in the kit and it looks just as the one in the photos.  I thought it would be a high quality belt.  Boy was I wrong.  In this case, looks were DEFINITELY deceiving.

 Immediately after reassembling and turning the dryer on, I was met with this awful smell of what was extremely similar to marijuana (cannabis/dope) burning.  The heat of the dryer brought out 'the smell of the rubber's composition' was my initial thought.  It was awful!! The smell filled the dryer drum, tainted our clothing and permeated into our residence.  

The more I used the dryer, the stronger the smell became.  I thought the smell may have been coming from the belt alone but wasn't 100% certain because I had replaced the drum rollers too.  But it didn't take me long to discover that others have had this same issue with some of the newer dryer belts on the market emanating a smell very similar to marijuana. 

SO, I sourced another belt, but this time made certain to ask questions before I purchased.  

I visited some of my older friends at ApplianceZone.net  this time.  I wasn't going to go through this again. Understanding that 'an appliance specific' parts distributor is more than likely going to have vetted part suppliers, I was most likely safer to go this route than to attempt an Amazon purchase again.  Therefore, I chose to speak with the individuals at Appliance Zone and they assured me they had not received had any complaints with their belts but had heard my story before from others.  

 Thankfully, the replacement from them rectified my issue.  No more smell of burning marijuana.  I couldn't trash that old belt fast enough.

My synopsis-- some foreign country, most likely China is using hemp fibers for reinforcement of their rubbers to make these dryer belts.  These belts do not give off any such smell when handled fresh out of the package (new) until heat from the dryer comes into the equation.  Then, your day is about to be disrupted.  Of course, when you remove the used dryer belt you can smell the residuals along it's entirety thereafter.  

Do yourself a big favor....perhaps steer clear of all the 'dryer upgrade kits' on Amazon with photos similar to those found above.  I'd even ask questions in the comment section before I purchased a single belt for dryers too, if I was set on using Amazon.  Amazon doesn't have a vetted entry process into their sale's platform which prevents all of these subpar parts from entering our space. 

Whatever you decide to do-- please ask questions before you buy.  My share to save you time, irritation and having to take your dryer apart multiple times.


Thursday, January 13, 2022

New Skil Wormdrive SPT77WM with Magnesium body- shearing armature shafts - motor turns but blade doesn't

Almost two years ago I purchased a new Skil wormdrive saw 7-1/4” SPT77WM with the magnesium body. The saw has plenty of torque and never bogs down and I want to be able to love it but it’s not allowing me.

I’m preparing to replace my second armature within the saw. I purchased the saw ‘Factory Refurbished’, it arrived in what appeared to be extremely good condition, great condition actually, or so it appeared. No exterior blemishes, imperfections, dings or otherwise. Then it happened: I went to test the saw inside before I walked it out to the shop; squeezed the trigger….motor turned but output shaft did not. Things that make you say “Hmmmm”. Brand new out of the box and saw did not work.

So I played the game of service, sent it off, Skil made the appropriate repair and sent it back. Saw ran like a champ, plenty of torque, no bogging….smooth cutting.. felt nice overall and is/was a pleasure to use. I’ve only used it minimally since, cutting a board here and there. About a week ago now I was cutting a few pieces of 2x material…dry boards. For a split second, I heard a metallic mishap inside the saw and here we stand again…..blade not turning but motor did.

I knew it was the armature.

This time, I decided to dismantle the saw and repair myself so that I could inspect and diagnose for myself. Yep! – armature. The armature was sheared at the stepdown shoulder of the shaft [5/8” → 1/2”] Right there at that shoulder juncture….sheared completely in half.

This will make the second armature that I’m aware of which has sheared in this saw. Quite possibly the third armature—highly probable that was the reason for the Factory Refurbish prior to my purchase. Upon closer observation, the armature’s metal composition isn’t molecularly where it needs to be. One can actually see, the bonding locations at the shear point and it certainly wasn’t bonded thoroughly all the way through it’s cross section at the molecular level.

The armatures are obviously being made by the cheapest bidder and I couldn’t be more disgusted.

For all those that would—yes, I have sufficient voltage…no voltage drop. Using a short 10 foot, 12 gauge drop cord on 20A circuit. I even administered electrical tests to ensure no voltage drop at the shop under loads and through the cord…terminations….just to cover bases on my end. Sufficient sustained voltage and proper continuities. Voltage drops and/or improper amperage flow during loads ruled out.

But why would the first shaft be snapped directly from the manufacturer? My diagnosis is the metal composition at the pour….just cheaply wrought.

There could be good news, I suppose. The replacement armature which is enroute supposedly replaced ‘an obsolete armature’ for this saw. Could it be, the engineers caught on to the flaw and rectified it in this new armature creation? I don’t know. Perhaps. I doubt it but perhaps.

Like I said, I want to love the saw but it’s simply not allowing me. It’s certainly not your granddad’s Skil 77. Sad facet of the equation is, the armature windings, copper and even the field composure seem to be made of high end material. Seem to be made very well. (last two pictures)

I contacted Skil, they didn’t want to honor their product less than 2 years old and only used minimally. So I have purchased all replacement parts out of pocket and as I told the representative at Skil, “Oh it doesn’t matter that I paid $230 for a saw and it’s only been used a few days”. They simply were not willing to work with me or stand behind their product. I had attempted to have them send me an armature replacement but they wouldn’t. I also wanted to speak with the engineering tech representing that sector of the facility to no avail. Would like to have spoken with someone in the engineering department to converse regarding, to reach some sort of resolve to my musing. But—we are definitely not in the 80s any longer.

I’ll run this one with the new armature and see what happens. Anyone have any thoughts on Milwaukee or Dewalt in the event I need replacement entirely? Better yet, do you have an old Skil 77 you’d like to box up and mail this way. The old 4×4s…they were made right.


Saturday, December 26, 2020

Kenmore dryer model 110, 90 series wiring schematic and parts schematic

 So you've read this post --regarding looking behind your control panel on your Kenmore dryer model 110 --to locate your wiring schematic and cannot find it there.  Then here is some schematics which should help you out.  


 Kenmore dryer model 110, 90 series parts breakdown schematic, parts list, part number drawing, part numbers

You are more than welcome to copy, download and print these.  No problem.

Tuesday, December 3, 2019

Samsung dryer model DV48H7400EW runs but doesn't heat

Samsung dryer model DV48H7400EW runs but doesn't heat

So if your dryer has ran an entire cycle and you've opened the door to find wet clothes, this may be your solution to repair.

It could be a few things but more than likely it's either the thermostat, hi-limit cutoff fuse or the element, all of which are contained or either located on the heating element housing inside the lower portion of the dryer.  The thermostats and hi-limit cutoffs are made cheaply and are notorious for going out when you are depending on your dryer the most.

Quite often they'll go out during the winter months I've noticed.  I think this has to do with cold air entering the dryer housing, either from the ambient temperature of the room wherein it sits or by coming up inside the dryer's duct work from underneath a cold house.  Either way, the space around the element housing, including the thermostat and hi-limit cutoff switch become very cold...then someone comes along and gets them really hot, really quickly by turning the clothes dryer on.  These components and sensors are made too cheaply to handle these stark, very significant changes in temperatures.  As a result, they malfunction or either become defective and quit working all together.

Disassembling Samsung dryer model DV48H7400EW and gaining access.

Once you've removed the face of the dryer so that you can gain access to the heating element, the next step is to remove the duct plate off the rear of the dryer. Remove the one screw, pull the duct plate and 4" pipe all the way out of the dryer. It pulls straight out.

You'll be removing the element housing through this opening.  Not enough space to remove it through the front unless you remove the lint filter housing cover, which I elect not to because I'd rather not disturb the fragile foam seal strip associated with that cover.  They'll lose their integrity and fall apart.  It's just easier to remove the duct plate so that you don't have to worry about trying to figure out how you'd reseal that cover.


Take a peek inside this opening and look for the heating element housing.  You'll notice a wiring harness feeding the heating element housing. Trace those two wires down- one attaches at the front of the housing and the other at the rear of the housing:  one is attached to one of the spade terminals of the heating coil itself, the other is attached to the hi-limit cutoff switch at the rear. 

It doesn't matter which terminal is used when you reconnect these two wires later.  As long as you reconnect to one of the heating coil terminals and either one of the hi-limit cutoff switch terminals.  The hi-limit cutoff is simply just a single pole switch essentially, just breaking a set of internal contacts inside, so you can't accidentally place a wire on the wrong terminal. 

WEAR GLOVES--very sharp edges everywhere inside -- very gently remove those wires, may take a little rocking side to side as you pull.  

Return to front of dryer and remove the one screw securing the housing onto it's base.  Pull towards you to dislodge from rear flange and then pull the housing out of the rear opening.


Remove a few screws and you can take the housing apart and remove the heating element.


 There wasn't anything wrong with my coil this time, I got a great ohm reading but chose to replace anyway because I had the dryer opened.  Plus, notice there is a crack in the plate. So i'll just replace.


 Where to find the part number? - This one just so happens to DC47-00019A heating element 5300 watts.  Purchased all three (element, thermostat and hi-limit cutoff as a package deal) on Amazon for $33.  Just used dryer model number to locate.


I took an Ohm reading across both thermostats when the new one arrived just to compare the two.  The new one rendered 0 which is superb but the old one gave me a reading of 2.7 Ohms, which is quite a bit of resistance internally for this type switch.  Two days ago I couldn't get a reading at all through the old one, there were obviously open contacts inside, so it's definitely defective.  My culprit indeed!! 


When you're installing your new heating element if you purchased one, be very careful pulling a coil or two apart so that you can arrange your coil leads to get them through the side of the housing.  Just don't want to put any sharp bends of significance into them.

Run one terminal through one square cutout in housing and one through the other square.  Then slide the terminals into your rectangular insulating ceramic.  Make sure you have the tenons of the ceramic facing the housing.  Don't do as I accidentally had done, had terminals in place and barbs bent only to discover I had it on backwards.


 Notice how you the small barbs are bent to keep terminal secured in block.  Needle nose pliers are your friend.

Mount sensors and reinstall jumper wires.


When installing heating element housing back in place, make sure that the rear portion of the housing slides inside the slip flange.  See detail below.  The flange is oversized and therefore the parts should mate with ease. 
 

Reconnect two hot wires.  Then replace duct pipe and duct plate.  The pipe should very easily slide over it's flange.  A little different than the element housing mating.  The element housing slides inside it's flange whereas the duct pipe slides over.

You're all done.

Please consider

Thursday, July 4, 2019

Samsung dryer not heating -- disassembly DV48H7400EW/A2 5400 watt - gaining entry

Disassembly of your Samsung 5400 watt clothes dryer (model DV48H7400EW/A2).


The first thing -- unplug unit or either turn off circuit breaker in panel.

Next, locate the two little black clips on the rear of the dryer....near the top.  Remove the upper half of the clips.


Sit the clips off to the side.  

Now you'll need to pick up the rear of the top approximately 2" and jiggle it forward to free the front lip of two hidden snap retentions.  Jiggle but be cognizant, there is a wiring harness with it's associated attachments to mating plugs secured on the underside of this top.  It's going to give you some resistance, but just jiggle gently from side to side at the rear as you push gently forward.  There are a couple of hidden clips in the front which lock the top down at it's seam.  Just keep that wiring harness in mind and you should be fine. 


Once you've dislodged the top and it's free-- you're gonna need to reinstall the two upper halves of those black clips you took off earlier.  Now these will serve as your hinge.  

You'll need to prop the top up with either a piece of light pipe or either a section of wood approximately 24" in length.  Drill a small 1/8" hole, perpendicularly across each end and run a 6-8" piece of copper wire or other stiff wire through, which you can use to tie the prop in place into holes in the housing.  Otherwise, that lid will inadvertently fall when working on the dryer.

Remove the eight galvanized plate screws and remove the plate from the dryer...those two little black bumper screws on each corner are two of those eight screws which need to be removed.  Now, you'll be able to reach your hand in behind the top of the cover and disconnect the wire connector to your 'open door' switch and remove the drum light wiring.  Stand in front of the dryer while you work and don't allow top of the front to come foward too much as to damage those wire connections.    

Using a very small #1 or smaller screwdriver, depress the LED drum light plastic retention clips down into --towards the interior of the drum-- to free the drum light still attached to it's wiring.  Go gently.


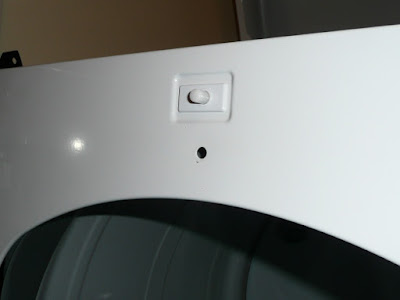
Next, you'll need to remove the three screws on the dryer face.  One above drum and two below near the filter housing.  Remove the filter at this time.


Now the front will rise almost straight up, out of it's holding brackets located at the bottom.  It should come up with minimal resistance.  If you are having to struggle or there's seemingly too much resistance, you need to stop and take a deeper look into....it should come up easy.


A detail to remember when you are planning to put the dryer back together:  The front sits down into these 90 degree seats. Notice the underside of the front once it is removed-- there are slits which fit back onto those 90 degree seats above. 


~back to disassembling--
Remove the mount for the heating element, so that you can pull it out through the rear.  It will only come out through the rear.  Remove the cover at the bottom of the dryer which the duct line goes through.  

To check the dryer's heating element, grab you an electrical meter and turn it to the Ohms setting.  Read through the coil as shown below.  If it's good, it will read somewhere between 7-12 ohms resistance. If you do not receive any reading, it's a dead giveaway that your coil is broken or burnt out somewhere.  Pull it out of the housing and check it thoroughly.  Once you remove the screw, the heating element will slide out of the housing.  Be careful, sharp edges.

These pictures below are from a prior dryer...just showing you these because I didn't get any further photos for the Samsung, beyond what you see immediately above.  That is how the Samsung Dryer heating element housing comes apart.  I'm showing you these pictures below, just so you can see how segments of the element coil will break off.  


found my culprit-- section snapped during heating action


I purchased a new one from https://www.appliancezone.net/.  I've ordered numerous parts from Appliance Zone, too many to name, and never had one issue with any of them.  Great customer service too.  I think they are a family owned business, or at least they used to be, therefore I support them.  I like supporting American family businesses. The numbers you'll need to order a new heating coil are in the corner of the support plate.


New one arrived. By the way this rectified my issue.  Back in business and drying clothes again with my Samsung DV48H7400EW/A2 clothes dryer.


Please consider

-- samsung clothes dryer not heating  -- samsung DV48H7400EW/A2 clothes dryer not heating  -- how to disassemble samsung DV48H7400EW/A2 clothes dryer -- how to disassemble Samsung 5400 watt clothes dryer -- how to take samsung dryer housing apart on front load dryer